Tuesday, February 4, 2014
Installation--"Rock Art"
So, we had a fire drill during class a couple of weeks ago. We were lined up outside, on a path next to some xeriscaping. I had the installation project in the back of my mind--still hadn't decided what to do. While we were standing out there, I began to notice all of the interesting shapes, colors, textures, strata, etc. that made up the rocks. I began to think about how I could use that inspiration for my installation.....
I began the process by repainting a bazillion squares of color. The Bristol Board that we had been doing our mixing color samples would be too stiff to wrap around a rock. I used recycled packing paper, which was nice and thin and crinkly.
Next, I tore the painted squares into smaller shapes--mostly rectangles and squares. I learned how to tear paper on the correct grain so that I didn't end up with an unpainted edge along the torn edge--you learn something new every day!
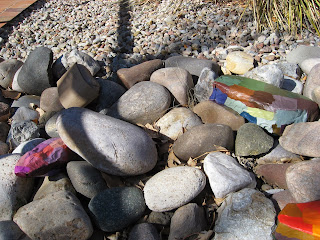
Here is the view of my 5 "Art Rocks" as seen coming down the path. The orange rock seems to stand out the best, catching one's eye, and then hopefully the viewer will have a closer look to see what it is all about.
Can you see them now? Five rocks, one in neutral grays and browns, one in reddish browns and dusty greens, one in blues, one in pinks and purples, and the last one in orange. Had some technical difficulties along the way, but all in all, I am pleased with the outcome.
Subscribe to:
Post Comments (Atom)


No comments:
Post a Comment